


© 2024 EasyEDA Some rights reserved ISO/IEC
Editor Version
×
Standard

1.Easy to use and quick to get started
2.The process supports design scales of 300 devices or 1000 pads
3.Supports simple circuit simulation
4.For students, teachers, creators
Profession

1.Brand new interactions and interfaces
2.Smooth support for design sizes of over 5,000 devices or 10,000 pads
3.More rigorous design constraints, more standardized processes
4.For enterprises, more professional users
Ongoing
STD 2.04" E-ink Display Shield
Mode: Editors' pick
- 3
Update time:
2021-12-10 17:19:06
Creation time:
2016-01-12 06:00:42
Description
2.04" E-ink Display Shield
--------------------------
Introduction
Do you like Amazon Kindle’s E-paper screen? E-ink Display Shield, an E-paper & shield which uses exactly the same techniques, provides you a smooth and clear reading experience for you.
It has a super-low power consumption. It won’t consume power until next refreshing of its screen, which enables it to maintain a clear display even in the power-off state.
Users can customize texts and position of the characters displayed .Due to the character chip inside, it knows of 175 countries’ language and their respective characters.
![enter image description here][1]
Features
High resolution
Low power consumption
Wide viewing angle
Four grey level modes
Maintains a clear display in the power-off state
Supports characters of 175 languages
Specifications
Item Min Typical Max Unit
Voltage 4.8 5.0 5.2 V
E-ink Panel Size 2.1 inch
Active Area 2.04 inch
E-ink Drive Ic SSD1606 mm
Interface Type SPI /
View angle 0~180 Deg
Display Resolution 172(H)X72(V) /
Dot Pitch 0.28X0.28 /
Dimension 68X63 mm
Backlight --- /
Pins usage on Arduino
![enter image description here][2]
Pins Used for E-ink Control:
D3: VPP, Power Supply for OTP Programming.
D4: GT_CS, GT20L16P1Y select input pin.
D5: Eink_D/C, E-ink Data/Command control pin.
D6: Eink_CS, E-ink select input pin.
D7: BUSY, E-ink Device Busy Signal,When Busy is High, the operation of the chip should not be interrupted, command should not be sent.
Pins Used for SPI Interface:
D10: SPI chip select
D11: SPI MOSI pin
D12: SPI MISO pin
D13: SPI serial clock pin
Usage
Following is a test using E-ink to display Chineses and displaying Characters.
Hardware Installation
1. Connect E-ink Screen with the shield via the FPC connector
2. Connect Arduino with PC via USB cable
3. Stack the E-ink Display shield onto your Arduino board
When you finished the hardware connection, it should look like this.
![enter image description here][3]
Update E-Ink Library
1. Download the SeeedEink Library.
2. Unzip/copy the including folder to the path: ..\arduino-1.0\libraries
The following program is written to test the function of displaying characters. This demo code can be used as a test program as well as reference for your further exploration of other functions of the board.
Demo 1:Displaying characters
1. Restart the Arduino IDE. Open “displayCharacter” example via the path: File --> Examples --> SeeedEink -->displayCharacter.
2. Learn about the command. In “displayCharacter”, the function we use is described as follow.
Name: displayChar(INT8U x,INT8U y,INT16U unicode_Char);
Function: Display a char of which the starting point is located at (x, y), The parameter unicode_Char is the character machine code.
3. Upload the code. There should come up several characters on the screen as shown below.
![enter image description here][4]
4. If you do not want to change the display, you can remove the screen, the characters will still be displayed.
Note:
1) X must be the value in the range of 0 -14, y must be the value in the range of 7-171; The screen area occupied by a character as shown below.
![enter image description here][5]
2) If X is greater than 14 or y is less than 7 ,the character cannot display normally;
3) See the page 18 to 24 of the GT20L16P1Y datasheet to find references for the unicode_Char; The characters include Latin、Hebrew、 Thai、Greek、 Kirill and Arabic. All the characters size is 8X16;
4) The unicode_Char between 0x0020 to 0x007E can directly input via the keyboard. Such as the display of the character 'G' ,the function can be displayChar(3,10,'S') or displayChar (3,10,0x0047);
5) Every E-ink can display up to 84 characters.
Demo 2:Displaying Chinese
1. Open the “displayChinese” example. 2. Learn about the command. In “displayChinese”, the function we use is described as follow.
Name: displayChinese(INT8U x, INT8U y, INT16U unicode_Chinese);
Function: Display a Chinese character of which the starting point is located at (x, y), The parameter unicode_Chinese is the Chinese machine code
Note:
1) X value must be between 0 to 14, y value must be between 15 to 171. The screen area occupied by a Chinese character is shown below. If X is greater than 14 or y is less than 15, it cannot display Chinese normally.
![enter image description here][6]
2)The unicode_Chinese of the Chinese can see GB2312 (Simplified Chinese) character code table. Every Chinese character size is 16X16.
3) The E-ink can display up to 40 Chinese.
3. The screen can also display two-dimensional code, just add the function displayTwoDimensionalCode(INT8U x,INT8U y) into the demo code, the starting point of two-dimensional code is located at (x, y). The phone can scan two-dimensional code to enter our website.
Displaying two dimensional code
1. If you want to display other two dimensional code, just change the values of the array dimensionalData[].
These values can get by converting two-dimensional code to lattice data. My method of getting lattice data is a bit lame, yet you can click here to see it if you are interested.
2. X value must be between 7 to 14. Y value must be between 25 to 171.
3. Upload the code. There should come up several Chinese characters and a two-dimensional code on the screen as shown below.
![enter image description here][7]
From: http://www.seeedstudio.com/wiki/E-ink_Display_Shield
[1]: /editor/20160112/569496a3c7342.png
[2]: /editor/20160112/569496c7d4bb8.png
[3]: /editor/20160112/569496e20769e.png
[4]: /editor/20160112/569496fac0e49.png
[5]: /editor/20160112/56949714497b5.png
[6]: /editor/20160112/5694972961d35.png
[7]: /editor/20160112/56949743817f0.png
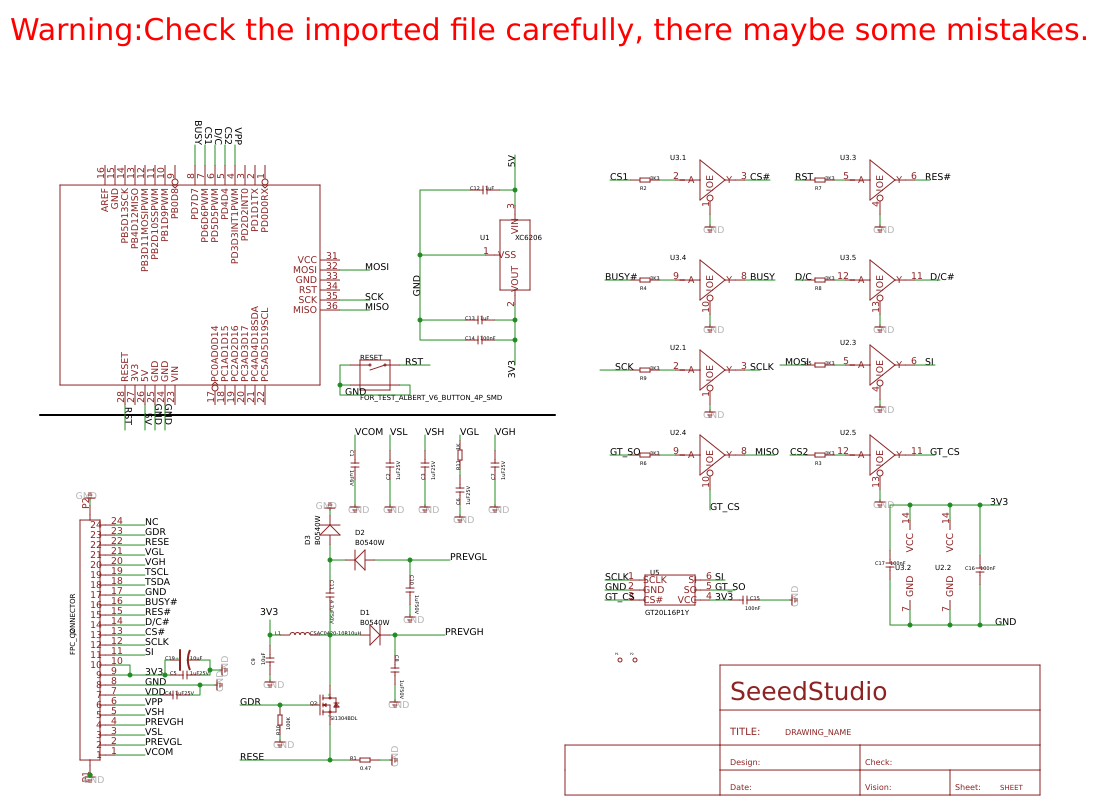
Design Drawing
schematic diagram
(
1
/
)
PCB
(
1
/
)
The preview image was not generated, please save it again in the
editor.
| ID | Name | Designator | Quantity |
|---|---|---|---|
| 1 | 1uF6V | C1 | 1 |
| 2 | 1uF25V | C4,C5,C2,C3,C6,C7 | 6 |
| 3 | 1uF50V | C8,C10 | 2 |
| 4 | 10uF | C9 | 1 |
| 5 | 4.7uF50V | C11 | 1 |
| 6 | 0.47 | R1 | 1 |
| 7 | XC6206 | U1 | 1 |
| 8 | 1uF | C12,C13 | 2 |
| 9 | SEEEDSTUDIO_SCH_FRAME | U$15 | 1 |
| 10 | 74VHC125PW | U2,U3 | 2 |
| 11 | 100nF | C15,C16,C17,C14 | 4 |
| 12 | 3K3 | R2,R4,R5,R6,R7,R8,R9,R3 | 8 |
| 13 | ARDUINO | U4 | 1 |
| 14 | GT20L16P1Y | U5 | 1 |
| 15 | SI1304BDL | Q2 | 1 |
| 16 | 100K | R10 | 1 |
| 17 | 1K | R11 | 1 |
| 18 | 10uF | C19 | 1 |
| 19 | FPC_CONNECTOR | J2 | 1 |
| 20 | FOR_TEST_ALBERT_V6_BUTTON_4P_SMD | RESET | 1 |
| 21 | PAD-MARK | P1,P2 | 2 |
| 22 | CSAC0420-10R10uH | L1 | 1 |
| 23 | B0540W | D3,D1,D2 | 3 |
Unfold
Project Members


 0
0
 3
3
Collect to album
Target complaint
Related Projects
Change a batch
Loading...
Add to album
×
Loading...
reminder
×
Do you need to add this project to the album?