


© 2024 EasyEDA Some rights reserved ISO/IEC
Editor Version
×
Standard

1.Easy to use and quick to get started
2.The process supports design scales of 300 devices or 1000 pads
3.Supports simple circuit simulation
4.For students, teachers, creators
Profession

1.Brand new interactions and interfaces
2.Smooth support for design sizes of over 5,000 devices or 10,000 pads
3.More rigorous design constraints, more standardized processes
4.For enterprises, more professional users
Ongoing
STD E-inkV0.9
Mode: Editors' pick
- 1
Update time:
2021-04-10 08:05:31
Creation time:
2016-01-12 05:39:54
Description
Introduction
The Bluetooth Shield integrates a Serial Bluetooth module. It can be easily used with Arduino/Seeedstudio for transparent wireless serial communication. You can choose two pins from Arduino D0 to D7 as Software Serial Ports to communicate with Bluetooth Shield (D0 and D1 is Hardware Serial Port). The shield also has two Grove connectors (one is Digital, the other is Analog) for you to install Grove modules.
Features
Input Voltage: 3.3V
Baudrate: 9600, 19200, 38400, 57600, 115200, 230400, 460800
Seeeduino/Arduino compatible
Up to10m communication distance in house without obstacle
UART interface (TTL) with programmable baud rate (SPP firmware installed)
Default Baud rate: 38400, Data bits: 8, Stop bit: 1, Parity: No parity
Default PINCODE:”0000”
A full set of configuration commands
On board PCB Antenna
FCC Part 15 Certificated
Interface funcion
BluetoothInterface.jpg
Pad Type Description
PIO1 Status instruction port of Bluetooth module can be read by Arduino A1 port: low-disconnected, high-connected.
BT_RX UART Data input of Bluetooth module.
BT_TX UART Data output Bluetooth module.
Two Grove connectors One is Digital (D8 and D9), the other is I2C/Analog (A4 and A5).
Demonstration 1:Two Bluetooth Shield Connect
This demo will show you how to connect two Bluetooth shield.
You need two piece of Seeeduino V3.0, a Grove - Button, and a Grove - LED.
One Bluetooth Shield as Master while the other as Slave, and there's a Botton connect to the Master, a Led connect to Slave.
When the button press up, the led in Slave will change.
Hardware Installation
Firstly, we choose a Bluetooth Shield as Master, and plug Grove - Button to D8,D9 of this Bluetooth Shield.
For the Slave, we connetc Grove - Led to it's D8,D9 Grove. And D7 as TX, D6 as RX, as folowing:
![enter image description here][1]
Download Code and Upload
You can download the code in github, click here,then extract it to libraries folder of Arduino.
Open Arduino IDE, open File -> Examples -> Bluetooth_Shield_Demo_Code -> Master_Button, then you can open the code of Master
Open Arduino IDE, open File -> Examples -> Bluetooth_Shield_Demo_Code -> Slave_led, then you can open the code of Slave
Click Upload to Upload the code, if you have any problem about how to start Arduino, please click here for some help.
![enter image description here][2]
Check The Result
After finish Uploading the code to both Master and Slave, reset the two devices meanwhile
You can see the red and green led blink, indicate that devices was initializing and connecting.
After about servel seconds, only green led blink, indicate that Master and Slave had connected.
Now you can press up the button, then the led will change its state.
Note: If the phenomenon is not observed above, try unplugging the power and re-plug in again.
Demonstration 2:Connect to Smart Phone
This demo will show you how to connect Bluetooth Shield to a Smart Phone.
We need a Seeeduino V3.0, a Grove - Temperature Sensor, and what's more, a Smart Phone that with Bluetooth function.
Via a Bluetooth SPP App, we send a 't' to Bluetooth Shield, then it'll return the temperature.
Hardware Installation
Plug Grove - Temperature Sensor to A4,A5 Grove of Bluetooth Shield.
TX connect to D7 while RX connect to D6. as folowing:
![enter image description here][3]
Download Code and Upload
You can download the code in github, click here,then extract it to libraries folder of Arduino.
Open Arduino IDE, File -> Examples -> Bluetooth_Shield_Demo_Code -> Slave_Temperature, then you can open the code
Click Upload to Upload the code, if you have any problem about how to start Arduino, please click here for some help.
![enter image description here][4]
From:http://www.seeedstudio.com/wiki/Bluetooth_Shield
[1]: /editor/20160112/569492110a16f.png
[2]: /editor/20160112/569492204cbb9.png
[3]: /editor/20160112/5694923893243.png
[4]: /editor/20160112/5694924a986e7.png
Design Drawing
schematic diagram
(
1
/
)
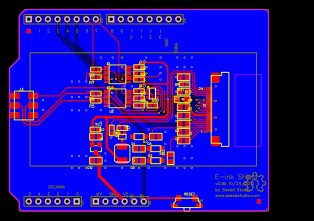
PCB
(
1
/
)
The preview image was not generated, please save it again in the
editor.
| ID | Name | Designator | Quantity |
|---|---|---|---|
| 1 | 1uF6V | C1 | 1 |
| 2 | 1uF50V | C8,C10 | 2 |
| 3 | 10uF | C9 | 1 |
| 4 | 4.7uF50V | C11 | 1 |
| 5 | XC6206 | U1 | 1 |
| 6 | 100nF | C16,C17,C15,C14 | 4 |
| 7 | 100K | R10 | 1 |
| 8 | 1K | R11 | 1 |
| 9 | FPC_CONNECTOR | J2 | 1 |
| 10 | FOR_TEST_ALBERT_V6_BUTTON_4P_SMD | RESET | 1 |
| 11 | 1uF25V | C2,C3,C6,C7,C4,C5 | 6 |
| 12 | B0540W | D3,D2,D1 | 3 |
| 13 | 0.47 | R1 | 1 |
| 14 | 1uF | C12,C13 | 2 |
| 15 | SEEEDSTUDIO_SCH_FRAME | U$15 | 1 |
| 16 | 74VHC125PW | U2,U3 | 2 |
| 17 | 3K3 | R2,R4,R5,R6,R7,R8,R9,R3 | 8 |
| 18 | ARDUINO | U4 | 1 |
| 19 | GT20L16P1Y | U5 | 1 |
| 20 | SI1304BDL | Q2 | 1 |
| 21 | 10uF | C19 | 1 |
| 22 | PAD-MARK | P1,P2 | 2 |
| 23 | CSAC0420-10R10uH | L1 | 1 |
Unfold
Project Members


 0
0
 1
1
Collect to album
Target complaint
Related Projects
Change a batch
Loading...
Add to album
×
Loading...
reminder
×
Do you need to add this project to the album?