


© 2024 EasyEDA Some rights reserved ISO/IEC
Editor Version
×
Standard

1.Easy to use and quick to get started
2.The process supports design scales of 300 devices or 1000 pads
3.Supports simple circuit simulation
4.For students, teachers, creators
Profession

1.Brand new interactions and interfaces
2.Smooth support for design sizes of over 5,000 devices or 10,000 pads
3.More rigorous design constraints, more standardized processes
4.For enterprises, more professional users
Ongoing
STD Grove - 3-Axis Compass V1.0
Mode: Editors' pick
- 0
Update time:
2021-04-09 20:10:42
Creation time:
2016-01-09 06:46:20
Description
Introduction
This 3-axis digital compass features a low field magnetic sensing multi-chip module HMC5883L, which provides up to 1° to 2° heading accuracy. HMC5883L consists of high-resolution HMC118X series magneto-resistive sensors, as well as Honeywell developed ASIC containing amplification, automatic degaussing strap drivers, offset cancellation and 12 bit ADC. With peripheral power management circuit added, this is an easy to use and reliable compass module for low cost compassing and magnetometry.
Specifications
Input Voltage: 3.3V, 5V
Sleep Mode Current: 2.5uA
Measurement Mode Current: 640uA
High resolution
Easy to control I2C interface
Compatible with either 3.3V or 5.0V development platform
Max 116Hz output rate
High heading accuracy
Demonstration
With Arduino
This demo is going to show you how to read raw data, how to calibrate the data with your local magnetic declination angle and how to get heading angle.
First off, before any action you are going to take, you need to prepare a parameter you are going to use in your demo. That's your local magnetic declination.
You can find it out in degree via the magnetic declination webpage. For example, mine is -2°37’, which is -2.617 degree.
Then transfer it from degree to radians, and there you get the "declinationAngle". For example, in my case, declinationAngle = -2.617 * π / 180 = -0.0456752665 rad. Three significant figures are enough. So I would shorten it into -0.0456 rad. And this is the parameter you are going to replace the value of "declinationAngle" in the domo code with.
Now let's start to run your compass.
1. Plug the 3-axis compass into the I2C port of Grove - Base Shield.
2. Download the library file: Digital Compass Library. Unzip it into the libraries file of Arduino IDE by the path: ..\arduino-1.0.1\libraries.
3. Open the demo by the path:File -> Example ->Digital Compass ->HMC5883L_Example.
![enter image description here][1]
4. Replace the value of variable "declinitionAngle" with the one you've figured out already.
5. Upload the Code. Please click here if you do not know how to upload.
6. Check the output result by opening the serial monitor.
![enter image description here][2]
With Raspberry Pi
1.You should have got a raspberry pi and a grovepi or grovepi+.
2.You should have completed configuring the development enviroment, otherwise follow here.
3.Connection
Plug the sensor to grovepi socket i2c-x(1~3) by using a grove cable.
4.Navigate to the demos' directory:
cd yourpath/GrovePi/Software/Python/
To see the code
nano grove_compass_lib.py
nano grove_compass_example.py
import grove_compass_lib
c=grove_compass_lib.compass()
while True:
print "X:",c.x,"Y:",c.y,"X:",c.z,"Heading:",c.headingDegrees
c.update()
time.sleep(.1)
5.Run the demo.
sudo python grove_compass_example.py
[1]: /editor/20160109/5690ade5b0fc1.png
[2]: /editor/20160109/5690adf799c7d.png
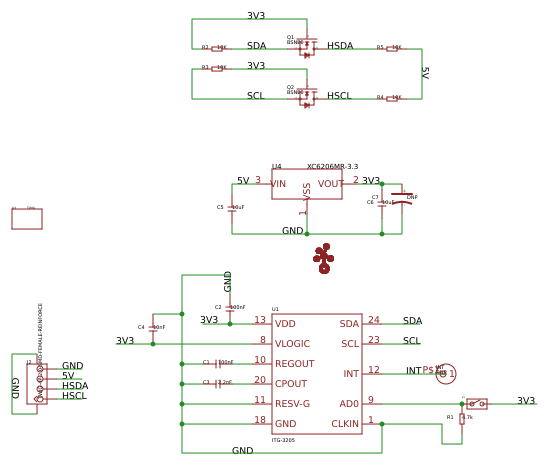
Design Drawing
schematic diagram
(
1
/
)
PCB
(
1
/
)
The preview image was not generated, please save it again in the
editor.
| ID | Name | Designator | Footprint | Quantity |
|---|---|---|---|---|
| 1 | ITG-3205 | U1 | QFN-24 | 1 |
| 2 | DNP | INT | CK_1X1 | 1 |
| 3 | 10nF | C4 | C0603 | 1 |
| 4 | 2.2nF | C3 | C0603 | 1 |
| 5 | 100nF | C1,C2 | C0603 | 2 |
| 6 | TWIG-4P-2.0-SMD-FEMALE-REINFORCE | J2 | 4P-SMD-2.0 | 1 |
| 7 | TWIGLOGO | U$1 | TWIGLOGO_SMALL | 1 |
| 8 | 4.7k | R1 | R0603 | 1 |
| 9 | DNP | JP1 | JP_SW | 1 |
| 10 | TWIG | U3 | 1U-DIM-W-DRILL | 1 |
| 11 | XC6206MR-3.3 | U4 | SOT23 | 1 |
| 12 | 10uF | C5,C6 | C0805 | 2 |
| 13 | BSN20 | Q1,Q2 | SOT23 | 2 |
| 14 | 10K | R2,R3,R4,R5 | R0603 | 4 |
| 15 | DNP | C7 | AVX-A | 1 |
Unfold
Project Members


 0
0
 0
0
Collect to album
Target complaint
Related Projects
Change a batch
Loading...
Add to album
×
Loading...
reminder
×
Do you need to add this project to the album?