


© 2024 EasyEDA Some rights reserved ISO/IEC
Editor Version
×
Standard

1.Easy to use and quick to get started
2.The process supports design scales of 300 devices or 1000 pads
3.Supports simple circuit simulation
4.For students, teachers, creators
Profession

1.Brand new interactions and interfaces
2.Smooth support for design sizes of over 5,000 devices or 10,000 pads
3.More rigorous design constraints, more standardized processes
4.For enterprises, more professional users

Ongoing
STD ATtiny85 TinyDFPlayer SMD
License: CC-BY-SA 3.0
Mode: Editors' pick
- 40
Update time:
2021-12-23 19:41:46
Creation time:
2019-04-20 19:46:55
Description
# Overview
TinyDFPlayer is an ATtiny controlled and LiPo battery powered MP3-Player using the DFPlayerMini module featuring:
- Micro-SD-card slot
- Battery charging and protection circuit
- Battery level detection
- OLED display
- On/off switch
- Volume control
- Three push buttons to control the player
- Remembers the last track played after switching off (EEPROM)
You can directly connect a 3.7 V Li-Po battery and a 3 W / 4 Ohm speaker to the board.
- Project Video (YouTube): https://youtu.be/QYjr8UXhs8I
- Firmware (Github): https://github.com/wagiminator/ATtiny85-TinyDFPlayer

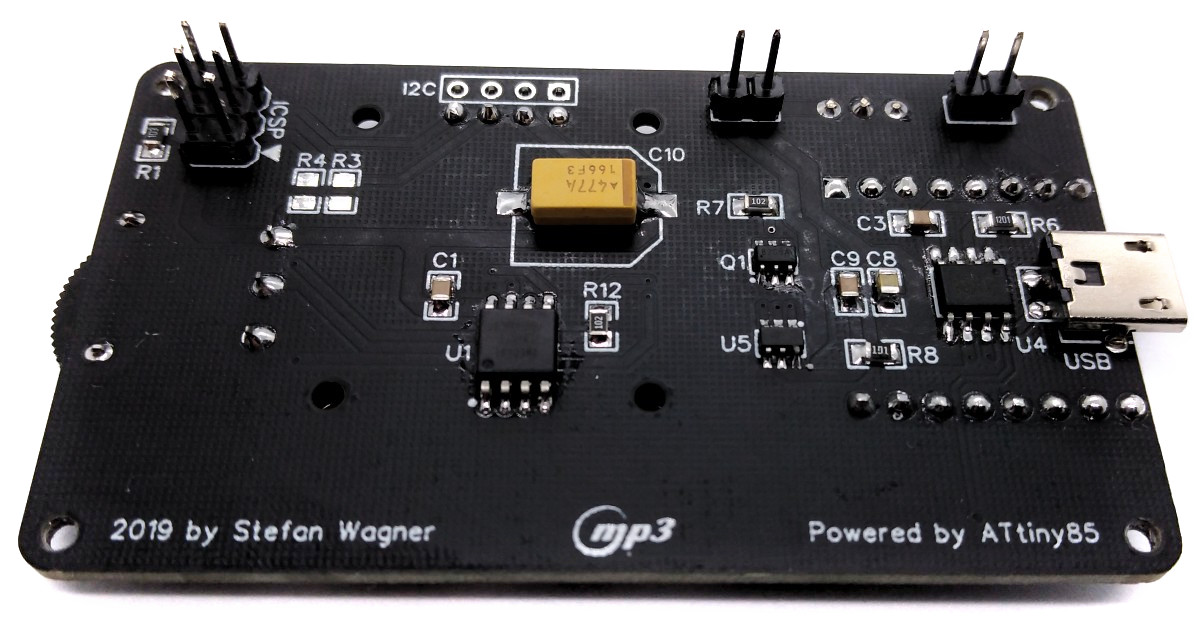
# Hardware
## DFPlayer Mini Module
The [DFPLayer Mini module](https://wiki.dfrobot.com/DFPlayer_Mini_SKU_DFR0299) is a serial MP3 module that offers the perfect built-in MP3 hardware decoding. It supports TF cards with FAT16 and FAT32 file systems. Music playback as well as other functions can be controlled by simple serial commands without cumbersome software implementation. The main features of the module are easy to use, stable and reliable functions.
## Battery Charger
For battery charging the [TP4056](https://datasheet.lcsc.com/szlcsc/1904031009_TPOWER-TP4056_C382139.pdf) is used. The TP4056 is a complete constant-current/constant-voltage linear charger for single cell lithium-ion batteries. The charge voltage is fixed at 4.2V and the charge current (max 1000mA) can be programmed externally with a single resistor (R6). The TP4056 automatically terminates the charge cycle when the charge current drops to 1/10th the programmed value after the final float voltage is reached. Other features include current monitor, under voltage lockout and automatic recharge. Charging is done via the built-in [Micro USB connector](https://aliexpress.com/wholesale?SearchText=micro+usb+2pin+dip).
## Battery Protection
For the battery protection (overcharge, overdischarge, overcurrent and short circuit protection) the [DW01A](https://datasheet.lcsc.com/szlcsc/1901091236_PUOLOP-DW01A_C351410.pdf) is used in combination with an [FS8205](https://datasheet.lcsc.com/szlcsc/Fortune-Semicon-FS8205_C32254.pdf) dual MOSFET. The DW01A is constantly measuring the voltage across the battery and the current flowing in (when charging) or coming out (when discharging). If something goes wrong it takes the battery out of the circuit by closing the MOSFET which acts like a switch between the negative side of the battery (B-) and ground. The overcurrent protection works by comparing the voltage drop across the MOSFET with the internal 150mV reference of the DW01A. As the RDS(on) of one FS8205 is around 2x25mOhm, the DW01A will close the MOSFET at 150mV/50mOhm = 3A.
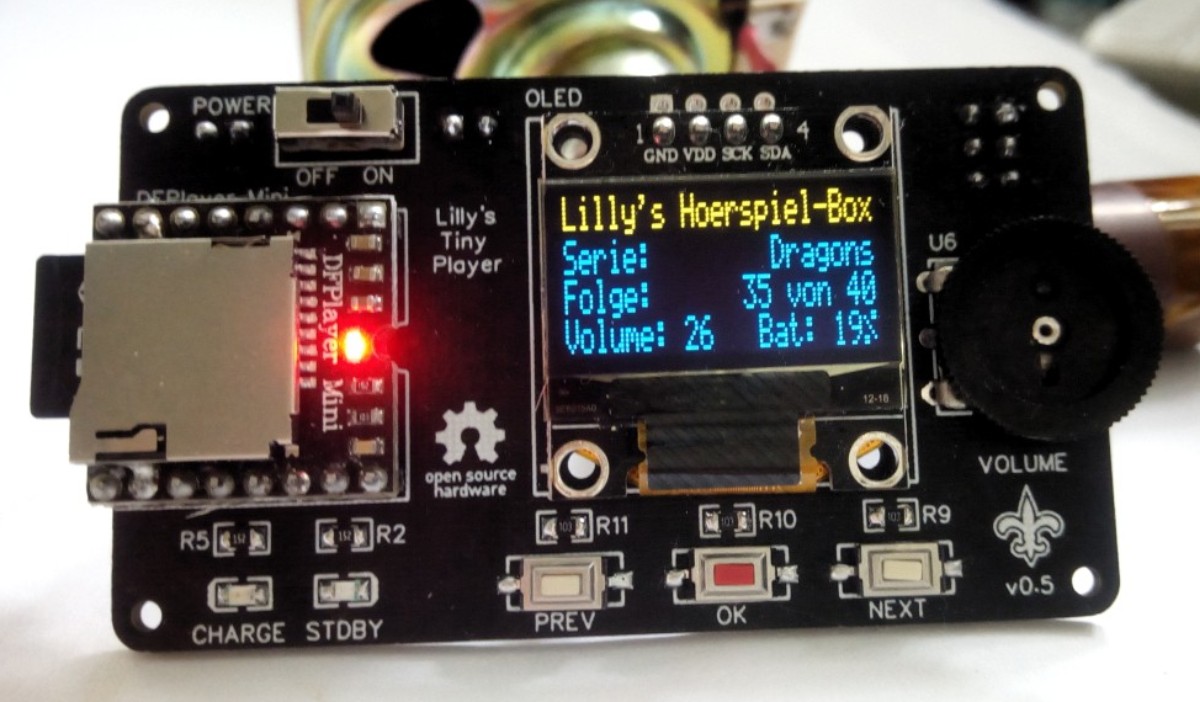
## User Interface
The user interface utilizes three buttons, a wheel potentiometer and a [128x64 pixels OLED display](http://aliexpress.com/wholesale?SearchText=128+64+0.96+oled+new+4pin). An [ATtiny85](https://ww1.microchip.com/downloads/en/DeviceDoc/Atmel-2586-AVR-8-bit-Microcontroller-ATtiny25-ATtiny45-ATtiny85_Datasheet.pdf) microcontroller brings it all together.
# Building Instructions
## Calibrating ATtiny85's Internal Oscillator
Error-free serial communication with the DFPlayer module requires precise timing. Usually the internal oscillator of the ATtiny85 used for this is sufficiently accurate (at least I haven't had any problems so far). However, the serial communication may not work due to an imprecise oscillator. It is therefore recommended to calibrate it manually. There are numerous instructions on how to do this on the [Internet](http://ernstc.dk/arduino/tinytuner.html). Alternatively, the [TinyICOC](https://github.com/wagiminator/ATtiny84-TinyICOC) or the [TinyCalibrator](https://github.com/wagiminator/ATtiny84-TinyCalibrator) can be used for this.
## Building the TinyDFPlayer
Solder all of the components onto the circuit board. Connect a 3.7 V Li-Po battery and a 3 W / 4 Ohm speaker to the corresponding pin headers.
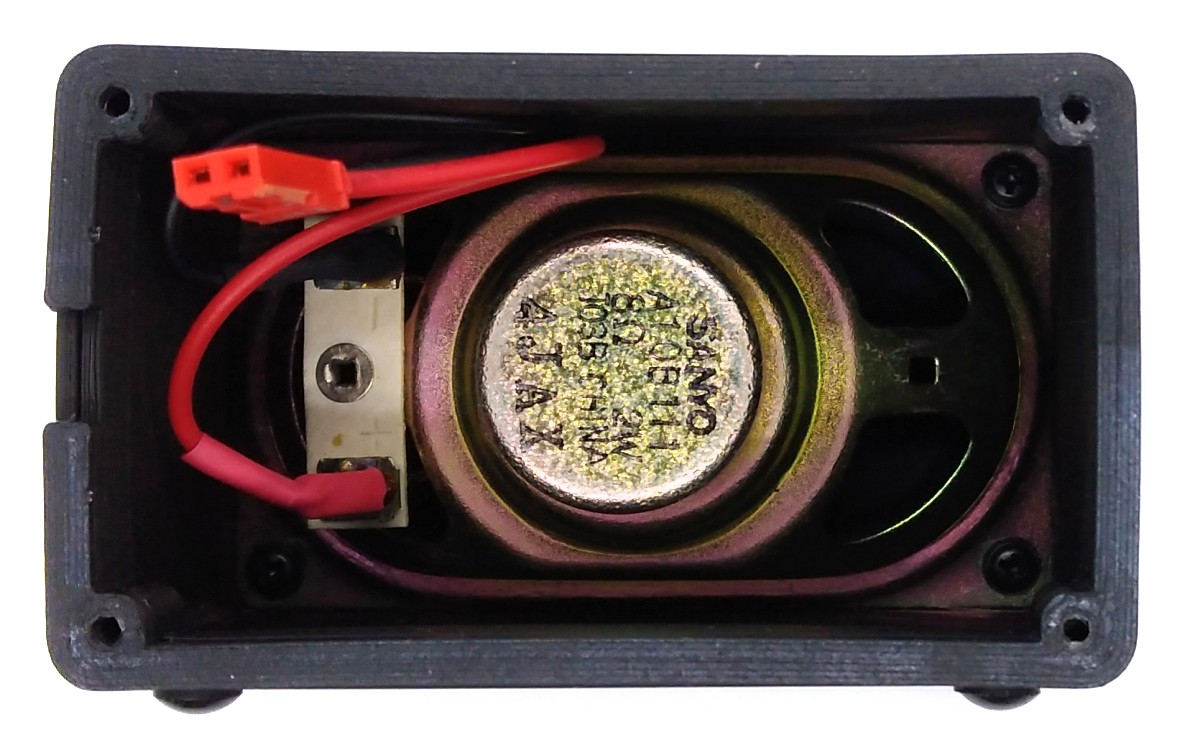
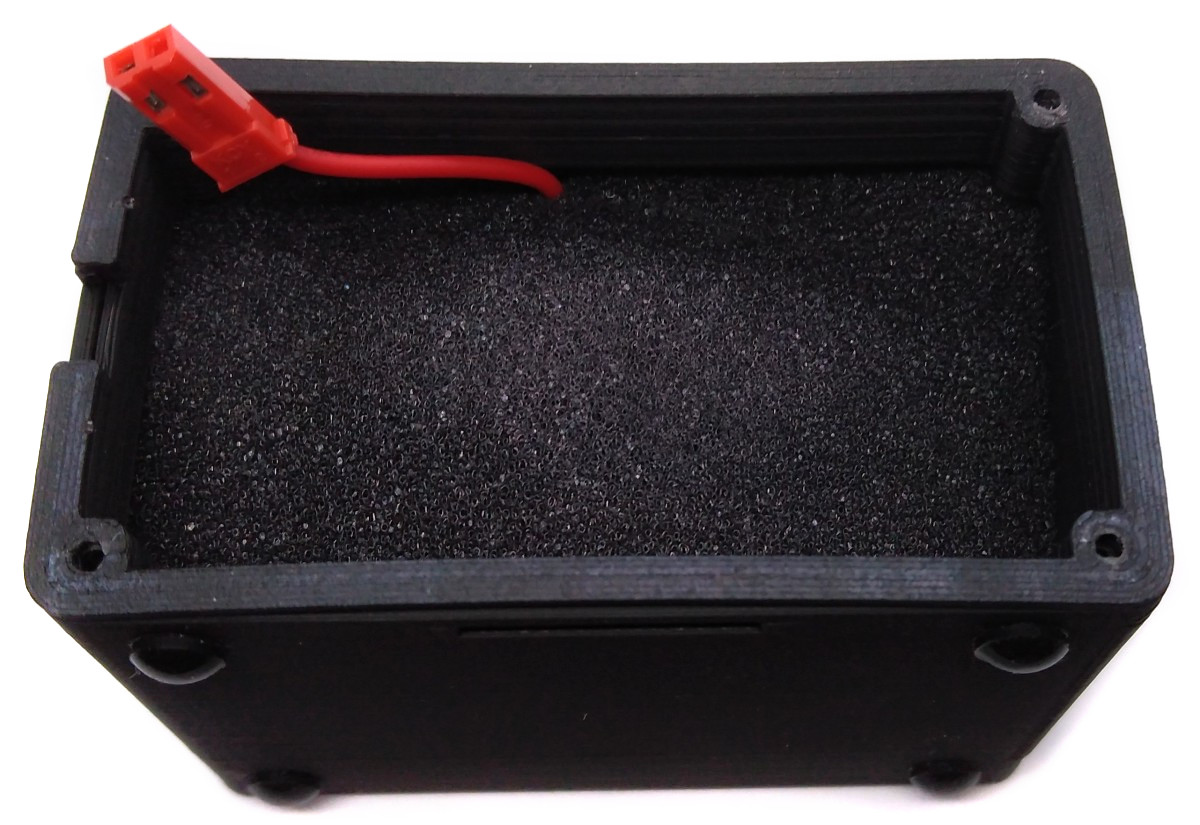
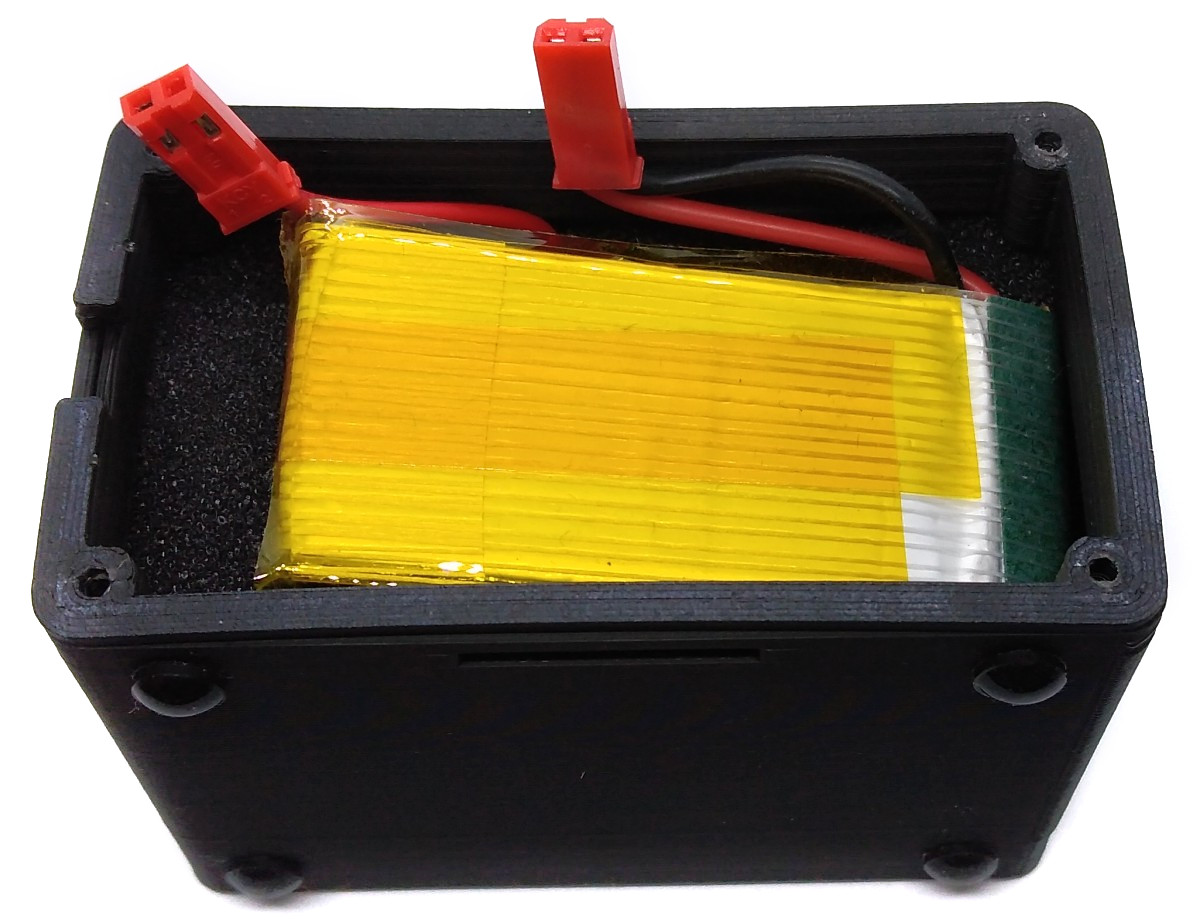
If you want to use the 3D-printed case, first install a [70 x 40 mm speaker](https://aliexpress.com/wholesale?SearchText=speaker+4070) in the lower part of the housing and screw it in with 2.3 x 5 mm self-tapping screws. Place an approx. 1 cm thick piece of foam behind the speaker, which fits tightly against the outer walls of the housing. This improves the sound quality significantly and separates the battery from the speaker. Then place the battery. Click the upper part of the housing on the lower part and screw on the TinyDFPlayer Board with 2.3 x 5 mm self-tapping screws. Glue four rubber feet to the underside of the player.
## Compiling and Uploading the Software
### If using the Arduino IDE
- Make sure you have installed the following core and libraries:
- [ATtinyCore](https://github.com/SpenceKonde/ATTinyCore)
- [TinyI2CMaster](https://github.com/technoblogy/tiny-i2c)
- [Tiny4kOLED](https://github.com/datacute/Tiny4kOLED)
- [DFRobotDFPlayerMini](https://github.com/DFRobot/DFRobotDFPlayerMini)
- Go to **Tools -> Board -> ATtinyCore** and select **ATtiny25/45/85 (No bootloader)**.
- Go to **Tools** and choose the following board options:
- **Chip:** ATtiny85
- **Clock:** 8 MHz (internal)
- Leave the rest at the default settings
- Connect your programmer to your PC and to the ICSP header of the device.
- Go to **Tools -> Programmer** and select your ISP programmer (e.g. [USBasp](https://aliexpress.com/wholesale?SearchText=usbasp)).
- Go to **Tools -> Burn Bootloader** to burn the fuses.
- Open TinyDFPlayer sketch and click **Upload**.
### If using the precompiled hex-file
- Make sure you have installed [avrdude](https://learn.adafruit.com/usbtinyisp/avrdude).
- Connect your programmer to your PC and to the ICSP header of the device.
- Open a terminal.
- Navigate to the folder with the hex-file.
- Execute the following command (if necessary replace "usbasp" with the programmer you use):
```
avrdude -c usbasp -p t85 -U lfuse:w:0xe2:m -U hfuse:w:0xd7:m -U efuse:w:0xff:m -U flash:w:tinyDFPlayer_v1.2.hex
```
# Operating Instructions
## Preparing the SD-Card
Micro SD cards (TF cards) with a maximum of 32 GB are supported. The card should be formatted in the FAT32 file system. The firmware is written for the folder-play function of the DFPlayer. This means you have to create folders named 01, 02, 03, ... in the SD card root and inside the folders you have to name the audio files 001.mp3, 002.mp3, ... The maximum number of folders is 99 and the maximum number of files per folder is 255. Don't leave gaps in the folders or file numbers. After the three-digit number of the MP3 files, the title name can be added for better identification, e.g. "003_MySong.mp3". Note that the title names cannot be read out and transmitted by the MiniDFPlayer module, so unfortunately it is not possible to display the title names.
There must not be any unnecessary files on the SD card, such as those stored there by MacOS (e.g. Spotlight). Better take Linux or Windows to write to the SD card. Under MacOS you can try to clean up with the following command:
```
$ dot_clean /Volumes/SD-Card
```
Insert the SD card into the corresponding slot of the DFPlayer Mini module.
## Operating the TinyDFPlayer
The device is switched on with the power switch. The two outer buttons are used to switch files and folders. The middle button is used to switch between pause and play. The wheel potentiometer is for choosing the volume. All necessary information is displayed on the OLED. To charge the battery, connect a 5V power supply via the micro USB port.
# License

This work is licensed under Creative Commons Attribution-ShareAlike 3.0 Unported License.
(http://creativecommons.org/licenses/by-sa/3.0/)
Design Drawing
schematic diagram
(
1
/
)
PCB
(
1
/
)
The preview image was not generated, please save it again in the
editor.
| ID | Name | Designator | Footprint | Quantity |
|---|---|---|---|---|
| 1 | Header | SPK | HDR-1X2/2.54 | 1 |
| 2 | Connector | BAT | HDR-1X2/2.54 | 1 |
| 3 | DFPlayer | U2 | DFPLAYER_MINI | 1 |
| 4 | 100n | C1,C9,C3 | 0805 | 3 |
| 5 | 10u | C8 | 0805 | 1 |
| 6 | I2C | I2C | HDR-4X1/2.54 | 1 |
| 7 | 470uF | C10 | CAP-SMD_D10.0-L10.3-W10.3-H10.2 | 1 |
| 8 | OLED | OLED | OLED | 1 |
| 9 | ATTINY85-20SU | U1 | SOIC-8_208MIL | 1 |
| 10 | USB PWR Connector | USB | USB PWR CONNECTOR | 1 |
| 11 | Slide Switch | POWER | SLIDE SWITCH DPDT 1P2T JB | 1 |
| 12 | FS8205 | Q1 | SOT-23-6 | 1 |
| 13 | ICSP-6 | ICSP | ICSP-6 | 1 |
| 14 | 3x6x2.5 | PREV,NEXT,OK | KEY-3.0*6.0 | 3 |
| 15 | 1k | R12,R7 | 0805 | 2 |
| 16 | 10k | R11,R10,R1,R9 | 0805 | 4 |
| 17 | 4k7 | R4,R3 | 0805 | 2 |
| 18 | 1k2 | R6 | 0805 | 1 |
| 19 | 1k5 | R5,R2 | 0805 | 2 |
| 20 | 100 | R8 | 0805 | 1 |
| 21 | DW01A | U5 | SOT-23-6 | 1 |
| 22 | 47u | C2 | 1206 | 1 |
| 23 | Red | L2 | LED-0805 | 1 |
| 24 | Blue | L1 | LED-0805 | 1 |
| 25 | TP4056 | U4 | SOP-8_EP_150MIL | 1 |
| 26 | B103 3 pin | U6 | B103 3 PIN | 1 |
Unfold
Project Members


 21
21
 40
40
Collect to album
Target complaint
Related Projects
Change a batch
Loading...
Add to album
×
Loading...
reminder
×
Do you need to add this project to the album?