


© 2024 EasyEDA Some rights reserved ISO/IEC
Editor Version
×
Standard

1.Easy to use and quick to get started
2.The process supports design scales of 300 devices or 1000 pads
3.Supports simple circuit simulation
4.For students, teachers, creators
Profession

1.Brand new interactions and interfaces
2.Smooth support for design sizes of over 5,000 devices or 10,000 pads
3.More rigorous design constraints, more standardized processes
4.For enterprises, more professional users

Ongoing
STD ATtiny13 TinyDice SMD
License: CC-BY-SA 3.0
Mode: Editors' pick
- 10
Update time:
2022-04-28 10:51:40
Creation time:
2019-12-17 17:37:44
Description
# Overview
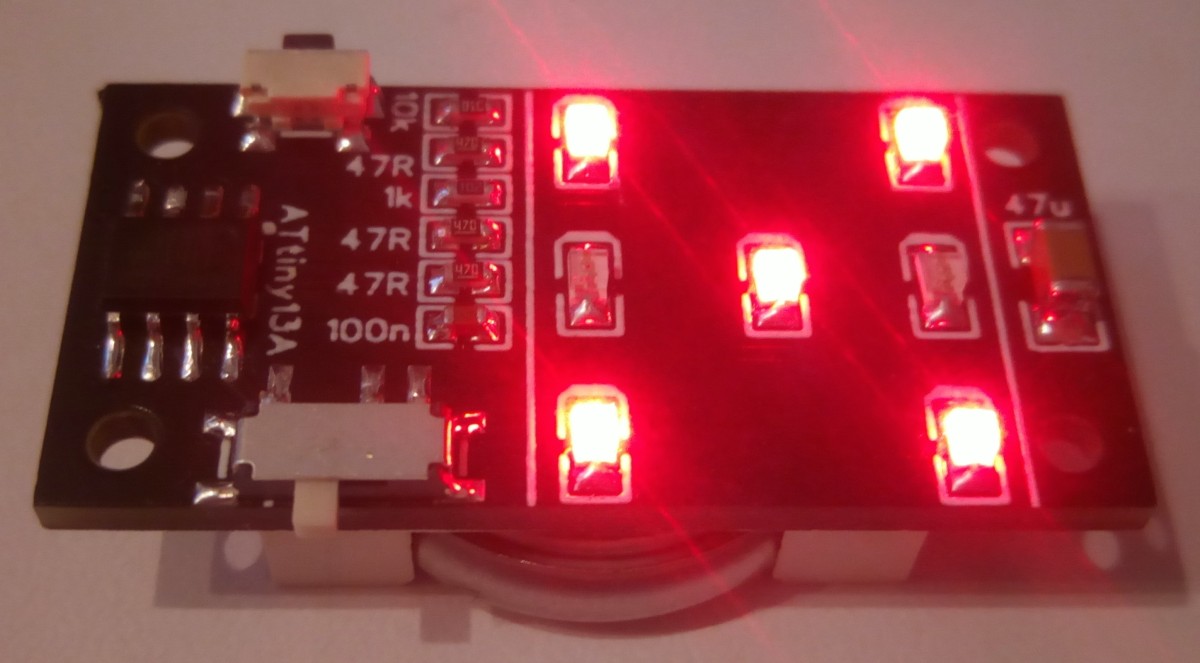
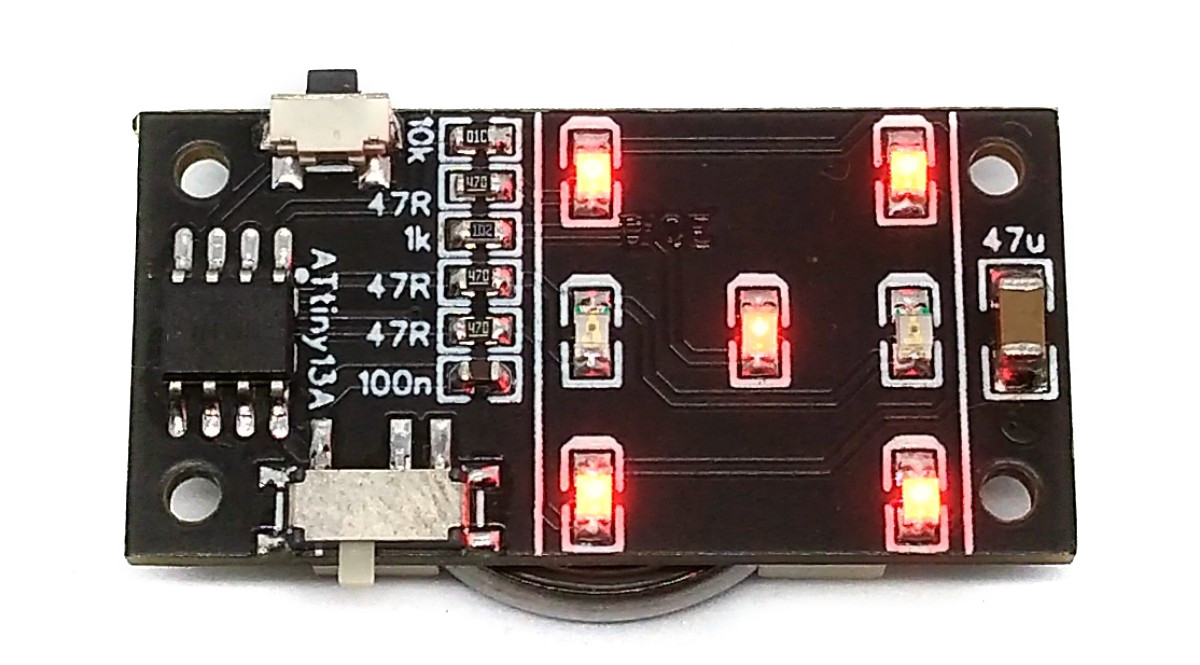
TinyDice is a tiny (35mm * 17mm) electronic dice powered by ATtiny13A.
- Project Video (YouTube): https://youtu.be/Zr3TuCeP4eM
- Firmware (Github): https://github.com/wagiminator/ATtiny13-TinyDice
# Hardware
The wiring is pretty simple:
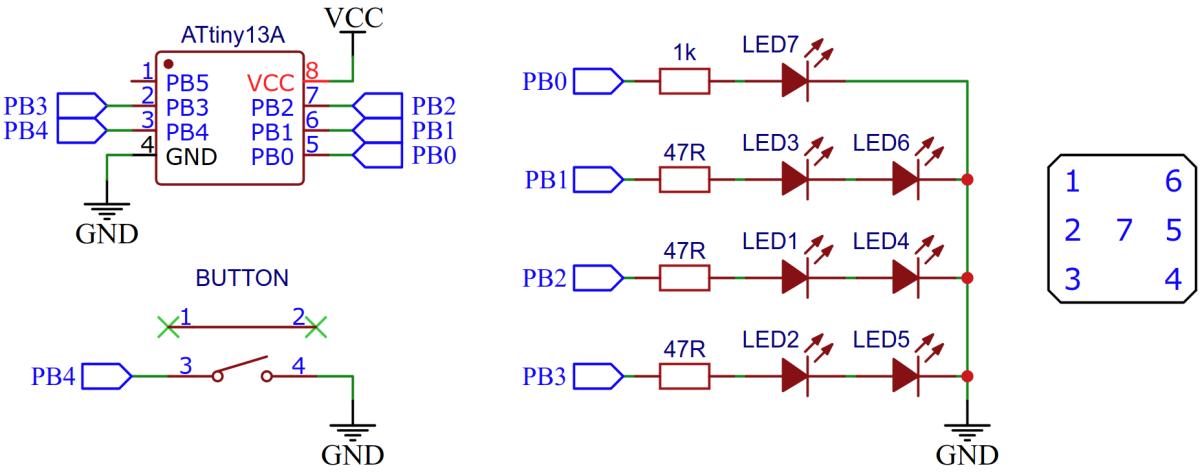
The fact that the opposite pairs of dots on a dice always appear together was used for the circuit diagram. This means that there is no need for Multi or Charlieplexing. However, the supply voltage must be at least twice as high as the forward voltage of the LEDs. Therefore only red LEDs and the rechargeable LIR2032 li-ion batteries should be used.
# Software
## Implementation
Timer0 is used to constantly change the number of pips in the background. Chance is created by the uncertainty of the moment the button is pressed by the user, which brings the current number of pips to display. As long as nothing else needs to be done, the ATtiny remains in IDLE and only wakes up when you press a button (pin change interrupt). Then it rolls the dice, in which a series of numbers are shown on the dice with increasing time interval. Finally, the last number shown remains and the ATtiny changes back to IDLE. The number of pips shown on the dice corresponds to the respective variable pips, which is constantly changed by the timer overflow interrupt. A simple matrix is used to control the LEDs, with which the respective number is converted into the values for the PORTB register.
```c
// Libraries
#include // for GPIO
#include // for sleep mode
#include // for interrupts
#include // for delays
// Global variables
volatile uint8_t pips = 0; // current number of pips
// Main function
int main(void) {
// Local variables
uint8_t matrix[] = {0b00110001, // 1
0b00110100, // 2
0b00110011, // 3
0b00110110, // 4
0b00110111, // 5
0b00111110};// 6 - for converting pips to pins
// Setup pins
DDRB = 0b00001111; // PB0 - PB3 as output, PB4 input
PORTB = 0b00110001; // pull-up for PB4/5; LED7 on
// Setup timer/counter
TCCR0A = 0b00000000; // no output
TCCR0B = 0b00000011; // set prescaler to 64
TIMSK0 = 0b00000010; // enable timer overflow interrupt
// Setup pin change interrupt
GIMSK = 0b00100000; // turn on pin change interrupts
PCMSK = 0b00010000; // pin change interrupt on button pin
SREG |= 0b10000000; // enable global interrupts
// Disable unused peripherals and set sleep mode to save power
ACSR = 0b10000000; // disable analog comperator
PRR = 0b00000001; // shut down ADC
set_sleep_mode(SLEEP_MODE_IDLE);// set sleep mode to IDLE
// Loop
while(1) {
sleep_mode(); // go to sleep
if(~PINB & 0b00010000) { // if button pressed:
for(uint8_t i = 0; i Board -> MicroCore** and select **ATtiny13**.
- Go to **Tools** and choose the following board options:
- **Clock:** 1.2 MHz internal osc.
- **BOD:** BOD disabled
- **Timing:** Micros disabled
- Connect your programmer to your PC and to the ATtiny.
- Go to **Tools -> Programmer** and select your ISP programmer (e.g. [USBasp](https://aliexpress.com/wholesale?SearchText=usbasp)).
- Go to **Tools -> Burn Bootloader** to burn the fuses.
- Open TinyDice.ino and click **Upload**.
### If using the precompiled hex-file
- Make sure you have installed [avrdude](https://learn.adafruit.com/usbtinyisp/avrdude).
- Connect your programmer to your PC and to the ATtiny.
- Open a terminal.
- Navigate to the folder with the hex-file.
- Execute the following command (if necessary replace "usbasp" with the programmer you use):
```
avrdude -c usbasp -p t13 -U lfuse:w:0x2a:m -U hfuse:w:0xff:m -U flash:w:tinydice.hex
```
### If using the makefile (Linux/Mac)
- Make sure you have installed [avr-gcc toolchain and avrdude](http://maxembedded.com/2015/06/setting-up-avr-gcc-toolchain-on-linux-and-mac-os-x/).
- Connect your programmer to your PC and to the ATtiny.
- Open the makefile and change the programmer if you are not using usbasp.
- Open a terminal.
- Navigate to the folder with the makefile and sketch.
- Run "make install" to compile, burn the fuses and upload the firmware.
# References, Links and Notes
1. [ATtiny13A Datasheet](http://ww1.microchip.com/downloads/en/DeviceDoc/doc8126.pdf)
# License

This work is licensed under Creative Commons Attribution-ShareAlike 3.0 Unported License.
(http://creativecommons.org/licenses/by-sa/3.0/)
Design Drawing
schematic diagram
(
1
/
)
PCB
(
1
/
)
The preview image was not generated, please save it again in the
editor.
| ID | Name | Designator | Footprint | Quantity | BOM_Supplier Part | BOM_Supplier | BOM_Manufacturer | BOM_Manufacturer Part |
|---|---|---|---|---|---|---|---|---|
| 1 | MSK-11027 | KEY1 | MSK-11027 | 1 | C21381 | LCSC | ReliaPro | MSK-11027 Toggle Switches |
| 2 | TS24CA | KEY2 | SW-SMD_TS24CA | 1 | C393942 | LCSC | SHOU HAN | TS24CA |
| 3 | 47R | R5,R4,R3 | 0603 | 3 | C23182 | LCSC | UniOhm | 0603WAF470JT5E |
| 4 | 10k | R1 | 0603 | 1 | C25804 | LCSC | UniOhm | 0603WAF1002T5E |
| 5 | 1k | R2 | 0603 | 1 | C21190 | LCSC | UniOhm | 0603WAF1001T5E |
| 6 | CR2032-BS-6-1 | B1 | BATTERY-3 | 1 | C70377 | LCSC | Q&J | CR2032-BS-6-1 |
| 7 | Red | LED2,LED3,LED6,LED7,LED4,LED1,LED5 | LED-0805 | 7 | C2286 | LCSC | KENTO | KT-0603R |
| 8 | 100n | C1 | 0603 | 1 | C14663 | LCSC | YAGEO | CC0603KRX7R9BB104 |
| 9 | 47u | C2 | 1206 | 1 | C30300 | LCSC | FH | 1206F476M160NT |
| 10 | ATTINY13A-SSU | U1 | SOIC-8_150MIL | 1 | C14075 | LCSC | MICROCHIP | ATTINY13A-SSU |
Unfold
Project Members


 5
5
 10
10
Collect to album
Target complaint
Related Projects
Change a batch
Loading...
Add to album
×
Loading...
reminder
×
Do you need to add this project to the album?